skip to main |
skip to sidebar
(This is a re-run post that got deleted. So here we go again!)
Well it's kind of late to be posting this as a Christmas project, but maybe you can get an idea for next year, LOL!
This is a purse-sized Christmas planner, of sorts. It's basically a way to keep your gift purchases organized.
 Pretty plain and simple on the front but if I were to carry this in my purse, I wouldn't want any delicate embellishments on it. The sentiment is computer-generated.
I used two 4" coasters and assembled it with my Bind-it-All.
 I created the template in Excel based on what *I* wanted to keep track of if/when I use this. (For now, I'm still using my manilla file folder Christmas Planner though!)
This little book has a place to write the person's name at the top. Then below, you add the item(s) you buy for them as well as how much money you spent. There is also a column to check off when that item has been wrapped. I added that column because I have things stashed here and there throughout the house and I'm always afraid I'm going to forget a gift somewhere along the way!
I put a lot of pages in this book so I can use it several years hopefully. It helps to refer back to previous years to see what we gave to people.
This is probably my last post until after Christmas so I want to wish all of you a VERY MERRY CHRISTMAS! May you have a safe and happy holiday. I hope that we all take a moment to pause and remember the true reason for the season - the birth of Christ. God bless you!

I've been meaning to make one of these for awhile and finally got around to it yesterday. You know how "they" recommend you use a different password for every website you register on? Well, generally I do try to mix it up. But I have a little notebook where things like this are scribbled all over and also some post-it notes, just really unorganized. So here's my solution:
 A Password Book!
And when I realized how quick they were going to be, I decided to make an extra. It would make a great gift, right?!
When I thought of making one of these, I immediately thought of this stamp set by Inkadinkado that I have. It's perfect, don't you think? I stamped the images on watercolor paper with Brilliance Graphite Black ink, then heat embossed with Sparkle powder. The birds were colored with Tombow markers and a waterbrush.
 The Angel Company sells these DCWV Chipboard stacks which come in Brights or Neutrals. They make awesome covers for your Bind-it-All projects! I simply cut one in half for these books which gave me both the front and back covers. I have a full size Tonic guillotine paper cutter, which I love! It cuts right through this chipboard!
 Here are the inside pages. I made the template using Excel. They print out four per page on regular copy paper. Then I trimmed each password page to about 3 1/8" x 4 1/2" (just a hair under 4 1/2" actually). Again, with the Tonic cutter, I can cut several pages at once.
Anyway, all the info I need is here on these pages. Even a place for "notes" which is great if the site you're referencing is one of your favorite places to order stamping supplies! You can write down what you usually order from there, how much their shipping is, etc. Or any other information that will help save you time. The reason I added a line for "email" is I have 3 different email addresses so this way I can remember which one I submitted for that particular site.
So no more clicking on "forgot password?" - make yourself one of these cute little books instead!
Enjoy your week! Tootles!
ADD YOUR LINK TO THE LIST HERE IF YOU MAKE YOUR OWN PASSWORD BOOK!
Effective immediately, TAC will no longer be carrying the original Bind-It-All (the blue one). They are switching over to the new pink Bind-It-All Version 2.0 which you can read about HERE.

It looks very similar to the original blue one, but the new version has many enhancements. This also means the manufacturer suggested retail price is higher. TAC will be selling them for $80.95 (plus tax and shipping).
BUT, always remember - if you place a $100 order (either by yourself, or gather orders from friends), one of the hostess benefits is getting to purchase ANY product in the catalog for half price. And from now until November 3rd, you can get TWO half price items with the Double Dips promotion!
Enjoy the rest of your weekend!
Do you like my new blog header? I made it from a digital scrapbook kit called Lil' Miss Priss by Grace Bennett that I purchased from Elemental Scraps a long time ago.
Now on to my latest Bind-It-All project. I saw a knock-knock joke book on Nicole Heady's blog recently which inspired me to make my own version. My 2 youngest kids love knock-knock jokes so I made this for Aubrey's birthday (her party is in a couple hours and I can't wait for her to see it!)

The size of this little book is just under 3" square. Just right for a now-6 year old. I made the front and back covers from cereal box "chipboard" and covered them with pink Bazzill cardstock.
The image is from the Q.T. Hooty owl stamp set by Pink Cat Studio. I stamped it with brown pigment ink on watercolor paper then embossed with Sparkle embossing powder. I used Tombow markers and a water brush to color it.
Besides the fact that this book is too small for a lot of embellishing, I wanted to keep it simple. I'm sure it will be handled alot as she loves to read, so I didn't want to add things that would fall off and upset her that it "broke".

On Nicole's blog, she gave a link to THIS website with some really cute knock-knock jokes. I used Microsoft Word to make a custom formatted label template. I added 1/2" border at the top, bottom, and both sides and made each "label" 2 1/2" x 2 1/2". There are 12 to a page for 8 1/2" x 11" cardstock.
Once I copied/pasted and formated the jokes I wanted, I then printed them out on white cardstock. I printed them front and back by simply formatting the first page jokes right-aligned with 1" left margin on each label, the second page jokes left-aligned with a 1" right margin on each label, and manually turned the cardstock over to print page 2 on the back of page 1.
Making sure all of the 1" margins were to the inside, I put the book all together with my Bind-It-All and 1/2" black 0-wires. I wish I would have had brown wires this size but oh well!
Once I had the jokes formatted to print out, the book itself took hardly any time at all! I'm sure I'll be making more of these as my kids are invited to birthday parties and things like that.
Thanks for stopping by, enjoy the rest of your weekend! Tootles!
At my TAC Hostess Club meeting in May, we made little 4" coaster albums with the Bind-It-All. But we didn't decorate them - I made it their "homework" for June's meeting. That's when everyone brought theirs back all cute and embellished just for show-and-tell!
Here's what I did with mine:

This patterned paper is by Paperbilities from Walmart. I'll admit - with my hostess club ladies, I get a little lax about using non-TAC paper and cardstock. These ladies are all very good friends of mine and I know they're going to buy from me anyway. They are committed to the club until October for this year, LOL!
I used Bazzill Bitty Blossoms which can be purchased from The Angel Company (TAC), as well as the Polo Button Brads. The stamp sets I used are Simple-bet and Alpha Grunge, both from TAC.
I have so many post-it notes all over my desk here, that I haven't started using this little book yet. But I need to! I'm one of those people that forgets if I don't write it down AND remember to look at it. So I need all my notes in one place! And I think once I use all the sheets of paper in this book, it will hold a pad of post-it notes perfectly.
Thanks for checking in today, Tootles!
Another Bind-It-All project, YAY! I designed this project as a "challenge" during online-TAC-seminar on Paper Wings. Hope you enjoy it too!

DOUBLE ACCORDION ALBUM
by Vicki Hook
Supplies:
(4) 4” x 4” cardstock
(2) 3 3/4” x 9 3/4” cardstock
(2) 3 3/4” x 6 1/2” cardstock
(10) 3 1/4” x 2 1/2” cardstock OR tags, circles, etc.
(2) 4” square chipboard coasters
Scor-Pal
Bind-It-All & 5/8” O-wire
Adhesive, ribbon, stamps, ink, etc.
Directions:
1. Score both 9 ¾” long cardstocks at 3” and 6” using the Scor-Pal. Fold accordion style (mountain, valley, mountain)
2. Score both 6 1/2” long cardstocks at 1/2” and 3 1/2”. Fold accordion style.
 3. Adhere the 1/2” sections of the step #2 cardstocks to the back of the 3” sections of step #1 cardstocks. (See the picture above how they overlap in the back.) You should now have two long accordion folded pieces that are 15 3/4” long. Each piece will have one end section that is longer than the other sections.
4. Cover the front and back of both coasters with the 4” x 4” cardstock pieces and adhesive.
5. Using the Bind-It-All, punch holes in one side of each coaster as well as the longer end section of each accordion folded piece.
 6. Assemble the album with 5/8” O-wire. The longer end section of the accordion pieces will be next to the coasters and the folded parts will face each other in the middle. So this album will open in the middle and you pull the accordions out to the sides, one to the left and one to the right.

Let me know what you think and thanks for stopping by!
Tootles!
I had some of these jumbo tags stashed away and found them the other day when I was looking for something else. Every stamper has probably done that a time or two, right? Found something that you totally forgot you had when you were looking for something else, LOL! Anyway, I thought they would make a really cute Bind-It-All project.
 Again, I cut the covers from cereal boxes. These are covered with cardstock from the Genevieve collection by The Angel Company. The dimenions on the covers are 5" x 2" so that gives you an idea of the book size. Kind of hard to tell from the pictures.
I stamped "Celebrate" on the front from the stamp set More Elegant Sentiments by The Angel Company.
 I thought this book would make a neat birthday gift. If you're having a party - go around and have all the guests write a special message to the guest of honor and then present it to them when you're done. It would surely be a gift they would cherish!
So what do you think? I'm so glad you stopped by! Tootles!
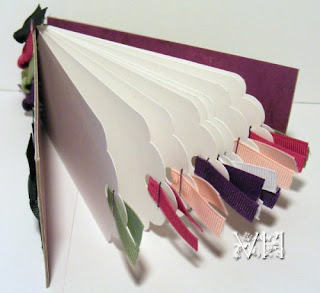
As promised, here is my "One Sheet Pocket Book On Steroids"! I absolutely LOVE this!
 Ok, so HERE is the tutorial for my One Sheet Pocket Book. Very quick and easy, right?!
Well, the book I'm showing you today simply has TWO of them facing each other with one back cover and two front covers that open in the middle. I was so thrilled with the way this vision turned out!
I adhered Bazzill Bling to the chipboard covers (which are simply cereal boxes cut to size). And the stamp is "So Girly Swirly" from The Angel Company. The stamped image was an afterthought and done after the book was all put together. Therefore, the image didn't come out solid because of all the layers underneath, but I think it turned out better that way - kind of goes with the whole distressed look!
 Here you can see it open with both pocket books inside. So this baby would hold LOTS of gift cards, tags, wallet photos, etc. What an awesome gift this would be!
The cardstock used on the pocket books is by K&Co. Instead of gluing the end pockets closed (as seen in my tutorial) I used colored staples on these. Then I flattened the back of the staples with needle-nose pliers so the pages lay flat. I was able to get closer to the edge by stapling instead of gluing the inside. It allows for a little wider pocket. (BUT, I also have another book coming soon where I used stamped address labels to hold the pocket edges together instead of gluing. This gives me FULL pocket potential!!! Pretty cool, right?! Go ahead - TRY IT!)
Of course I used my Bind-It-All to put this all together. It really wasn't as hard as it may look.
 The back cover is 4 1/4" x 6 1/4" and the two front covers are each 4 1/4" x 3 1/8".
Let me know what you think of this one! And on Sunday, come back for one more cool Bind-It-All project!
Thanks for looking, Tootles!
Ok, here is the first of my 3 new exciting projects - a Coupon Book! It's made out of CD envelopes! I know, right?! Who'dathunkit! This is the perfect little book for storing coupons because each page has a "window" so you can see at a quick glance if you have any coupons in that category or not. How cool is that!
We all know how the price of food is going up, up, up! So if you are a coupon clipper, then check this out!
 Supplies:
(8) CD envelopes
Bind-It-All
5/8" Bind-It-All O-wires
(2) 5" x 5" chipboard
(10) 5" x 5" patterned paper or cardstock
(2) 5" x 5" white cardstock
1" circle punch
paper trimmer
adhesive
file tabs/inserts
stamps, ink, ribbon, and other embellishments
Directions:
1. Using your paper trimmer, cut the flap off of each CD envelope.
2. Cover chipboard pieces with patterned paper on one side and white cardstock on the other.
 3. Stamp around the edge on the front of each envelope.
 4. Adhere patterned paper to the back of each envelope. I used the Brighten My Day Wing It Collection from The Angel Company.
 5. Punch a half circle at the top/front of each CD envelope using the 1" circle punch.
 6. Bind the book all together with the Bind-It-All.
7. Attach file tabs to each envelope. My categories are hand-written on the inserts. You can make up your own coupon categories but here is what I used: Beverages, Breakfast, Cleaners, Dairy, Fruit & Veg., Misc., Snacks, and Pet Supply.
 8. Embellish the front and back as desired.
Let me know what you think!
Remember my "One Sheet Pocket Book"? Well...............come back Friday to see my "One Sheet Pocket Book On Steroids"!!!! It's soooo cool!
Thanks for stopping by! Tootles!
I'm on a roll! TWO tutorials in a row! Actually, I have several things ready to show you. Some of them I've had done for awhile, and some I just made. Since I have the time today, I will be scheduling several posts to automatically show up on here over the next couple weeks. So keep checking back! On with today's tutorial.....
I have seen different variations of this, but I call it the "One Sheet Pocket Book". It's made out of one sheet of 12" x 12" paper and ends up with 8 pockets. The pages are 4" tall and approximately 2 5/8" wide (after binding).
 This is such a cute size! It's definitely purse-size and can be used for holding so many different things.
 In this picture, I have put some stamped images in the pockets. Wouldn't this make a great gift for a stamping friend?! Once they use up all the images, they can re-use the pocket book for something else. Here are some other ideas I've came up with for this little book:
Use it to hold
* gift tags *
* business cards *
* ATC's (altered trading cards) *
* wallet sized photos *
* phone numbers/addresses *
* credit cards *
* gift cards *
The possibilities are endless!
___________________________________________
ONE SHEET POCKET BOOK
Supplies:
One 12" x 12" sheet of paper or LIGHTweight cardstock (I used double-sided)
Bind-It-All
1/2" O-wires for the Bind-It-All
Scor-Pal
Paper trimmer or scissors
Adhesive
Stamps, ink, ribbon, etc.

Directions:
1. Using the Scor-Pal, score the cardstock at 6" (red/orange line in diagram).
2. Turn the cardstock over and score at 2" and 10" (blue lines in diagram). The reason I say turn it over is with the Scor-Pal, it is recommended that you fold your score lines with the bump on the INSIDE when possible. The indentation should be on the outside. It has to do with the way the scoring divides the fibers in your cardstock.
3. Now turn the cardstock 1/4" turn and score at 3", 6", and 9" (green lines in diagram).
4. Place adhesive as shown by the aqua lines in the diagram in four places. Fold at the 2" and 10" score lines, adhering them closed at the ends.
5. Using a paper trimmer or scissors, cut on the FIRST 6" score line made in step #1. You'll cut from the 3" score line all the way down to the bottom edge (orange line in diagram).
 6. Accordian fold each side until it looks like the picture above. Obviously in this case, all of your folds will not have the scored bump on the inside/indentation on the outside. But you will have a general guideline for folding. Also, as you can see - my ends have not been glued together yet in this photo as I've instructed to do in step #4. So do not be confused, LOL!
7. The two pockets at the bottom in the picture above will be adhered to each other, back to back.
 8. The entire book is too thick to fit into the Bind-It-All at once so you have to punch the holes in stages. First of all I punched holes in the two center folds at the same time.
 9. Then I punched each of the other two folds, one at a time. Make sure you're punching all of the holes on the same side of the book, with the pockets all on the same side.
10. Insert the 1/2" O-wire with the Bind-It-All. Usually when binding books, they recommend that you flip the back cover around to the front before putting your O-wires in. But you can't really do that with this little book. So the ends where your binding wires meet each other will show on the outside.
11. Embellish as desired with stamped images, ribbon, etc.
I did not add a cover because I used lightweight cardstock. But you could add a cover if you wanted, and also use alternate binding (ribbon, staples) if you do not own a Bind-It-All.
Hope you enjoyed this tutorial!
 Pretty plain and simple on the front but if I were to carry this in my purse, I wouldn't want any delicate embellishments on it. The sentiment is computer-generated.
 I created the template in Excel based on what *I* wanted to keep track of if/when I use this. (For now, I'm still using my manilla file folder Christmas Planner though!)


