skip to main |
skip to sidebar
Like I mentioned the other day, I got my inspiration for this card from an old vintage greeting card my friend Nancy had shown me. I just knew I had to make my own version and share it with you!
Let's get started:
1. Cut cardstock base to 8 1/2" x 5 1/2" and score at 4 1/4" for a regular A2 size card.
2. Let's do the inside first. I used patterned paper cut to 5 1/4" x 4" and cardstock cut to 4 3/4" x 3 1/2", stitched them together, and adhered them to the inside of the card.
3. Cut a strip of cardstock 1/2" or 3/4" wide and 8" long. (NOTE: In my sample, my strip is 1/2" wide but I think it could be a little wider for more weight support. Depends how heavy the layers will be that you're going to mount on this strip. Score and fold strip at:
2" (valley fold)
2 1/2" (valley fold)
5 1/2" (mountain fold)
6" (mountain fold)
7" (mountain fold)
7 1/2" (mountain fold)
 4. Adhere the last 1/2" flap to the long 3" section as shown above.
__________________________________
 5. Cut another piece of cardstock 1/2" x 2 1/2". Put adhesive on the ENDS ONLY - LEAVE MIDDLE OPEN as shown above.
__________________________________
 6. Adhere the small strip to the top flap inside the card, centered left to right, and about 1 1/2" down from the top edge of the card.
7. Slide the 2" section of long strip down through the short strip but do NOT adhere it! It will need to move freely up and down as you open and close the card.
__________________________________
 8. Adhere the 1/2" section on the bottom of the folded strip to the base of the card as shown above. It will be about 1/2" in from the center fold/score line.
__________________________________
 9. Cut, layer, and stamp two separate embellishments for the inside of the card. You can really put anything you want here, but just keep in mind how bulky it will be when you close the card. I stamped a sentiment on each of mine and they are both approximately 3 1/2" x 1 7/8" in size. Adhere one to the top section of the strip, and one to the bottom section as shown in the picture above. Here are two more pictures of this step from different views:


__________________________________
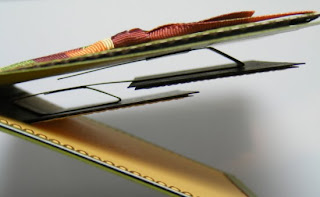 Here is a side view of what happens when you close the card.
__________________________________
 10. Stamp and embellish the front of your card and share with someone special!
__________________________________
 I stamped my image (from TAC) on watercolor paper with Brilliance Coffee Bean ink, and embossed with Sparkle embossing powder. Then I colored it with Tombow markers and a waterbrush.
If you make one of these, be sure to come back and leave me a comment with a link - I'd love to see it!
Have a wonderful weekend, Tootles!

Here's my final card (that I have ready) using scraps from my Cha Cha collection by TAC. Still have a few scraps left though, so one or two more cards will do it - then Cha Cha will be gone! It feels good to be using stuff up!!!
 The stamp set is called "Sunday Stroll" by TAC.
 These Tri-Shutter cards really do use quite a few scraps, depending on how you embellish it.
Hope you enjoyed my posts today (yes, there are two). Thanks for stopping by!

TRI SHUTTER CARD WITH GIFT BOX
by Vicki Hook
(this box is my original design, the card is not)
___________________________
Edited to add:
Just a note - the card I've shown here WILL fit in an A2 envelope (it's 4" x 5 1/2" when folded). I only created the box to allow for bulky or frilly embellishments on the front.
Also, the two 1 1/2" score lines on the card aren't functional folding lines. They simply give you a line to cut on.
Hope this clears up any confusion!
Have a great day!
Vicki
____________________________
Box
1. Cut cardstock to 7 3/8” x 10 5/8”.
2. Score at 3/4” on all four sides. (With a Scor-pal, one way to do this is to place the left edge of the cardstock on the 3 1/2” line and score at 4 1/4”.)
3. With the long side of the cardstock across the top of the Scor-Pal, score at 4 7/8”. (Place the left edge of the cardstock on the 1 1/2” line and score at 6 3/8” which is marked by a dot on the Scor-Pal.)
4. Flip the cardstock around so the other short side is clear to the left and the other long side across the top. Score at 5”. The distance between the step 4 and 5 score lines should be 3/4".
5. Use a 1” circle punch to cut a 1/2 circle notch out of the edge so you’ll know this is the lid of the box (lid should be 1/8” larger than the box bottom). See diagram below for score lines and placement of the notch. Click on the diagram if you need a larger view.

6. Before assembling the box, I used my Scor-bug to make 3 rows of “piercing” on the lid of the box. It may also be easier to add any other embellishments at this time, depending on your plan. See next two pictures for Scor-bug use:
 Place cardstock anywhere on the Scor-pal (I did mine face down so on top will look more like bumps than piercing, or mountains as opposed to valleys). Place the Scor-bug at the bottom score line, applying slight pressure to make sure you're in a groove of the Scor-Pal, and run the bug up to the top score line. Now you have a row of little bumps on the bottom of the cardstock that will help keep the cardstock in place. You can tell by sliding the cardstock slightly back and forth whether or not the bumps are lined up with a groove or not. Then I did another line 1/2" over, and another one 1/2" over from that. Do as many lines as you want.
 Mine look like this on the bottom of the cardstock.
7. Cut on the vertical score lines in to the 3/4” line that goes across the top and bottom. (See the blue lines in the diagram up at step 5.) This creates tabs that you will adhere to the inside of the box when you fold it up. For the center tabs, I adhered them to the inside of the lid, as opposed to the box bottom.
8. Embellish the box as desired.


Card
1. Cut cardstock to 5 1/2” x 12”.
2. With a short end across the top of the Scor-pal, score at 1 1/2” from each long side. (Two score lines total.)
3. Now with a long side across the top, score at 2”, 4”, 8”, and 10”.
4. Using a craft knife or paper trimmer, cut on the 1 1/2” score lines from the 2” line to the 10”. (See the blue lines in the diagram below. Again, click on the diagram for a larger view.)

5. Look at the picture below to see the mountain/valley folds of your Tri Shutter Card:

6. Here are the measurements I used for cutting decorative paper for the sections on the card and how many of each:
(2) 1 1/4” x 3 3/4”
(4) 1 1/4” x 1 3/4”
(2) 1 3/4” x 5 1/4”
(1) 2 1/4” x 3 3/4”
(2) 2 1/4” x 1 3/4”
7. Embellish the rest as desired!


_______________________________
I hope you enjoyed this tutorial. As always, feel free to leave a comment with any questions you may have. If something doesn't make sense, I need to fix it, LOL!
If you make one of these using my tutorial, be sure to leave a comment your direct link - I'd LOVE to see it! (Please leave the DIRECT link to your project post. Thank you!) I can't get my Mr. Linky code to work today, so just leave your link in a comment.
Have a great week and thanks for stopping by!
I had several ladies over for a stamping class last week and this is one of the projects we made. It's a Criss Cross Box and here is my sample that I originally showed you last week:
 As I mentioned in that original post, I found this project on Nicole Heady's blog. But I made my own version of the tutorial to share with my friends at my class, and I want to share it with you too!
DIRECTIONS:
 1. Score 8 1/2" x 11" cardstock at 3", 4", 7", and 8" as shown in the above diagram.
2. Turn cardstock 1/4 turn, and score at 4 1/4" and 3 1/4". To get your 3 1/4" score line, place the left edge of your cardstock on the 1" Scor-Pal line and score at 4 1/4".
 3. Now cut on your score lines where the red lines are shown in the above diagram. The gray shaded areas designate sections that will be completely removed. When cutting across the triangle sections, I like to use scalloped scissors. But of course you don't have to.
 4. To create patterned papers layers to add to the triangle sections on the front of your box, cut 2 pieces of paper 2 3/4" x 4" and cut them in half diagonally, EACH IN A DIFFERENT DIRECTION. See the above diagram.
If you are using single-sided patterned paper, you'll need to cut 2 rectangles to split diagonally and use one triangle from each set. You'll see that's the easiest way to get 2 triangles facing the proper directions. You can use the remaining 2 triangles for your next Criss Cross Box!
5. To cover the front center flap (directly behind the two triangle sections when it's all folded together) and the inside back of the box, cut two pieces of patterned paper to 3” x 2 3/4”, one for section. The one for the inside back of the box will not go all the way to the bottom of the box interior, but depending on what you put in it - it won't show. I just found it easier to have my ladies cut two pieces the same size.
 6. Fold into a box, adhering the sides. The front center section folds up first, then the triangles will overlap in front of it. Adhere them in place. It should look like the diagram above.
Embellish as desired.
Here is my sample again.
HOWEVER......
If you don't wish to mess with all of the extra patterned paper layers, you can easily make one with double-sided cardstock. Here's a sample I made like that:
 I created some coordinating little notecards to put in it. (Note: I DID add a layer to the center front flap behind the triangles. Otherwise, it would have been the same pattern as the triangles and blended in.)
Another easy idea to avoid all the extra layers is to stamp your own background on solid cardstock.
So come on ladies from my class - you know who you are! Go ahead and try another Criss Cross Box!!!
 You can do it!
(SMILE! I love ya!)
If anyone makes one of these using my tutorial, be sure to leave your direct link below - I'd LOVE to see it! (Please leave the DIRECT link to your project post. Thank you!)
TOOTLES!
I wanted to do a tutorial on my Double Treat Box that I showed you a couple days ago. I didn't take step-by-step photos as I was making it, but hopefully my directions will be clear enough. Just ask if you have any questions!
SUPPLIES
(2) pieces cardstock cut to 7” x 10 1/2”
Scor-pal
Adhesive
Patterned paper (I used pieces cut 2 1/2” x 8”)
Other embellishments
DIRECTIONS
 1. With long side across the top of the Scor-pal, score cardstock at: 2 1/2”, 5”, 7 1/2”, and 10”.
2. Now turn cardstock so the short side is across the top of the Scor-pal and score at 2” all the way down. Next, score at 4 1/2” but SKIP the last big section as shown in the above diagram.
 3. Refer to the second diagram and cut away the gray shaded areas. Also, make three cuts at the bottom as shown by the red lines.
4. Fold the sides around to form a box. Adhere the side 1/2” tab in place and also the bottom flaps. The box will have a “back” that stands up taller than the rest.
5. Repeat steps 1-4 for both pieces of cardstock.
6. Adhere them together, back-to-back.
7. Cover with patterned paper. The 8” paper I used goes from side seam, around to the other side seam (approximately). Then I covered the seams with a piece of 1” x 2 1/2” piece of cardstock and more patterned paper.
8. Embellish the rest as desired.

 Instead of putting the circles and stamped image where I did, you could punch a hole there for a carrying handle.
I hope you enjoyed this project! Enjoy your week, Tootles!
If you make one of these using my tutorial, be sure to leave your direct link - I'd LOVE to see it! (Please leave the DIRECT link to your project post. Thank you!)
Here's a quick template to show how I made the tri-fold card in my last post. I FINALLY remembered what I used to call these cards when I first made them a couple years ago - ZIG ZAG cards! (yeah, sometimes I have severe DUH moments! hush Patti, no comment, LOL!)
Anyway, here's the measurements. You get two cards from one piece of 8 1/2" x 11" cardstock if you cut like this:
 Click on the diagram if the numbers aren't clear.
Cut on the line shown. Then starting at the shorter end, score at 3" and 6 3/4".
 Fold "zig zag" style as shown here.
_____________________________
Speaking of severe DUH-itis, I had another case of that today! I got an email from Barbara asking me exactly how I folded my Twix candy bar holder I posted a while back. It took me a few days to get to her email (SORRY!) but I finally took time to help her out and well......no wonder she was confused!!! I totally messed those instructions up! I think what happened is when I designed that little project, I started out trying to make it bigger. So when I posted to my blog I must have looked at the wrong scribbles on my scratch paper. That's my story and I'm stickin' to it! heehee
Anyway, I have edited THIS post with correct measurements and score lines. THANK YOU Barbara for questioning me!!
Here's a tutorial for the little lifesaver box I originally showed you HERE. I've had a couple people request directions for this cute little box. Here's the thing, as I was designing the first one I wrote my measurements on a piece of scrap paper which has gone missing of course, lol. So I started from scratch, made another, and now I'm sharing it with YOU!
LIFESAVER BOX
1. Cut a piece of cardstock to 7" x 4 5/8".
2. With the 7" side across the top of your Scor-Pal, score at 1 1/4", 3 1/4", 4 1/2", and 6 1/2". Here are some tips to make this easier:
* For 1 1/4", place the left edge of the cardstock
on the 3" Scor-Pal line
and score at 4 1/4".
* For 3 1/4", place the left edge of the cardstock
on the 1" Scor-Pal line
and score at 4 1/4".
3. Turn cardstock one quarter turn to the left. The short side should be across the top, and the 6 1/2" score line from step #2 should also be at the top. Now score at 1", 3", and 3 5/8".
* For 3 5/8", place the 3" score line
on the 1 1/2" Scor-pal line
and score at 2 1/8" (the little dot right beside the 2).
 4. Click on the diagram above if you need a better view. Cut in to the first score line where you see red lines in the diagram. Be sure you're cutting in from the correct edge of the cardstock!
5. The gray shaded areas of the diagram designate sections to be removed. So cut those out now.
 This is what your cardstock should look like now. I have mine turned upside down from the diagram though, so don't let that confuse you.
 6. Begin assembling your box. First, I adhere the 1/2" flap on the box (not pictured). Next, I adhered the bottom.
I used Scor-Tape for this project - have you ever used this stuff? Oh my gosh, I absolutely love it! It's plenty sticky and the GREAT thing is - you can tear it with your fingers! No need to take time for scissors like with other double-sided tapes. Just rip a piece off, put it on the cardstock, and peel off the white layer. And look how much is on that roll! Gotta love more bang for your buck!
Ok, now back to our regularly scheduled programming, lol.
 7. Next, stack 5 lifesavers inside (the kind that are individually wrapped in cellophane) then adhere the top 2 flaps together.
 8. Embellish as desired.
The stamp set I used is called "Dear Friend" and it's in the new Serendipity Magalogue by The Angel Company.
If you make one of these using my tutorial, be sure to leave your direct link - I'd LOVE to see it!
 4. Adhere the last 1/2" flap to the long 3" section as shown above.
  5. Cut another piece of cardstock 1/2" x 2 1/2". Put adhesive on the ENDS ONLY - LEAVE MIDDLE OPEN as shown above.
 6. Adhere the small strip to the top flap inside the card, centered left to right, and about 1 1/2" down from the top edge of the card.
  8. Adhere the 1/2" section on the bottom of the folded strip to the base of the card as shown above. It will be about 1/2" in from the center fold/score line.
 9. Cut, layer, and stamp two separate embellishments for the inside of the card. You can really put anything you want here, but just keep in mind how bulky it will be when you close the card. I stamped a sentiment on each of mine and they are both approximately 3 1/2" x 1 7/8" in size. Adhere one to the top section of the strip, and one to the bottom section as shown in the picture above. Here are two more pictures of this step from different views:

 Here is a side view of what happens when you close the card.
 10. Stamp and embellish the front of your card and share with someone special!
 I stamped my image (from TAC) on watercolor paper with Brilliance Coffee Bean ink, and embossed with Sparkle embossing powder. Then I colored it with Tombow markers and a waterbrush.


