Let's get started:
1. Cut cardstock base to 8 1/2" x 5 1/2" and score at 4 1/4" for a regular A2 size card.
2. Let's do the inside first. I used patterned paper cut to 5 1/4" x 4" and cardstock cut to 4 3/4" x 3 1/2", stitched them together, and adhered them to the inside of the card.
3. Cut a strip of cardstock 1/2" or 3/4" wide and 8" long. (NOTE: In my sample, my strip is 1/2" wide but I think it could be a little wider for more weight support. Depends how heavy the layers will be that you're going to mount on this strip. Score and fold strip at:
2" (valley fold)
2 1/2" (valley fold)
5 1/2" (mountain fold)
6" (mountain fold)
7" (mountain fold)
7 1/2" (mountain fold)
 4. Adhere the last 1/2" flap to the long 3" section as shown above.
 __________________________________
 5. Cut another piece of cardstock 1/2" x 2 1/2". Put adhesive on the ENDS ONLY - LEAVE MIDDLE OPEN as shown above.
__________________________________
 6. Adhere the small strip to the top flap inside the card, centered left to right, and about 1 1/2" down from the top edge of the card.
 7. Slide the 2" section of long strip down through the short strip but do NOT adhere it! It will need to move freely up and down as you open and close the card.
__________________________________
 8. Adhere the 1/2" section on the bottom of the folded strip to the base of the card as shown above. It will be about 1/2" in from the center fold/score line.
__________________________________
 9. Cut, layer, and stamp two separate embellishments for the inside of the card. You can really put anything you want here, but just keep in mind how bulky it will be when you close the card. I stamped a sentiment on each of mine and they are both approximately 3 1/2" x 1 7/8" in size. Adhere one to the top section of the strip, and one to the bottom section as shown in the picture above. Here are two more pictures of this step from different views:

__________________________________
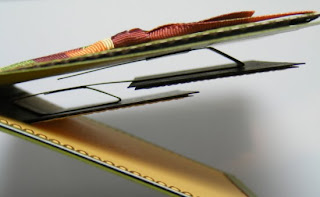
 Here is a side view of what happens when you close the card.
__________________________________
 10. Stamp and embellish the front of your card and share with someone special!
__________________________________
 I stamped my image (from TAC) on watercolor paper with Brilliance Coffee Bean ink, and embossed with Sparkle embossing powder. Then I colored it with Tombow markers and a waterbrush.
If you make one of these, be sure to come back and leave me a comment with a link - I'd love to see it!
Have a wonderful weekend, Tootles!

1 comments:
Great tutorial and gorgeous card!! It's absolutely stunning! :)
Post a Comment